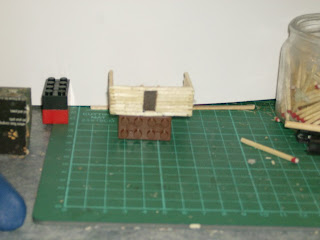
Lots of clamps and lego to hold everything in place. All right!! Time to add the cross piece above the door.
 Sacred Excrement!! I forgot about the window opening.
  Have craft knife, will fix mistake.
 A moment of pure serendipity here. Cutting that tiny window is easier than cutting gluing 4 rows of short logs.
Well, I'm (finally) back to posting my progress on the Log Cabin project. It's not that I haven't been mini-making, as I have completed and mailed several rounds of swaps, worked on a group project, completed the draft pattern for a 1:48 half-timbered, front opening cottage and the same thing in 144th, and researched what I have discovered is a 1947 Keystone Tudor style dollhouse. It is in 'well loved' condition, with slight damage to the peak of the dormer roof, but everything (even the lighting and wiring) is original. I bought it at a Mennonite Relief Committee sale, have no room for it and don't even know why I bought it, other than the fact it is something I would have loved to find under the Christmas tree in the early 50's. Growing up, dollhouses were for the 'rich kids', as were rabbit fur coat collars and muffs, swimming pools and trips to Florida. So for the time being, it sits in empty glory in a shaded bay window, where it can be seen only by anyone curious enough to look at the window beside them as they stand at the front door. Every time I see it I am briefly tempted to make and add some furniture from my stash of HOM kits, but somehow I think it looks best with the furnishings of my imagination.
Now down to business!! As you can see from the photos above, I was getting excited after my last post about getting the walls up and the door and window openings in place so I could get on to the rafters and roof. Everything was going so well getting the requisite 6 rows of logs glued in place leaving the door opening straight and exactly 1/4" wide, despite many interruptions by the telephone, doorbell and curious cats, that I forgot entirely about the window opening. This was supposed to employ part logs for rows 4-6, and it wasn't until the 7th row was firmly glued and I took the photos that I realised what I had done. After some forehead banging and a few choice expletives, I found a ready fix (aka a pencil, craft knife, small flat file and patience), so I didn't have to rip off the whole front wall. PLUS I found it far easier to cut out the opening than to fiddle with all the very small lengths of wood while trying to keep all the horizontal lines of both openings exactly even. If I do this type of structure again, I will probably do the door opening this way as well, but for now, I'll leave sleeping doors lie. :-D
PART 4- THE WALLS GO UP/ DOOR AND WINDOW OPENINGS
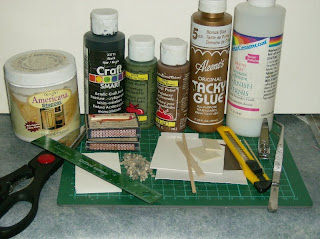
Select 4 matchsticks: 2 for the sides, and 2 which will be trimmed short to fit on either side of the front door opening.
1) Starting with the front, determine where you want you door to be and mark the centre of the doorway lightly in pencil on the foundation row. Measure and mark a point 1/8" on either side of the centre mark for the edges of the door opening. This will make a doorway about 34" wide in RL. I used a door width of 1/4" for simplicity and also because it happens to be the width of the skinny Lego blocks which I stacked to make sure the door opening stayed straight. (A scrap of 1/4" wood will work just as well.)
2)Measure the distance from each side of the door to the outer edge of the sides and cut matchsticks to fit. Make a step (notch) on one end of each piece as you did for the foundation row (see Day One Part 2) and glue in place on top of the base row with the plain ends even with the marks you made for the edges of the door opening and the notches facing upwards.
3) Measure the distance between the outer side of the front and back of the foundation row, trim the remaining matchsticks to fit, notch one end as above and glue to the base row with the notches fitted together with the front. Before the glue sets on this first row, check that everything is square and upright, adjust as needed, and if you are angle-challenged like me, clamp the newly glued row to Lego to hold the position for a few minutes while the glue sets a bit. Now you can read the next part of the instructions, visit the little girl's room, check the mailbox, give the cat you have been ignoring for the last 10 minutes a head-rub or amputate the heads from a few more matches.
4) Once this row is fairly well stuck down, do the same thing for 5 more rows of logs, for a total of 6 rows on all 3 sides, making sure to keep the door opening straight and all walls upright. (I did this part with a 3-4 minute delay between the gluing of each row which also gave me time to sit down and check a few e-mails after each row.)
5) Now it's time to add the 7th row, which will enclose the door opening and stabilise the front which is by now a bit wobbly. Take 2 matchsticks, and follow the instructions for making the front (or back) of the base row making the splice as inconspicuous as possible, Glue this long piece across the entire front, adjusting the walls if needed to keep the corners square and walls upright. Let dry for a good 10 minutes, then using 2 more matchsticks, finish the sides of this row.
NOTE: Here's where you get to benefit from my experience when I got distracted.
6) Place the structure with the front wall face down on a cutting mat and pencil in the outline of your window opening. Remember that windows were much smaller than they are nowadays. Mine are 3 rows of logs high and 3/16" wide, or roughly 36" high and 26" wide, which is a bit too tall for historical accuracy, but I think the occupants really want a bit more of a view than a 26"x26" opening would afford them. So choose your desired window size and mark it on the inside wall of the front.
Use a craft knife to gently score the cutting lines, going over them several times until you feel the knife break through to the cutting mat. From here keep poking the knife tip through the wood until the cut-out part will separate from the main wall. File or scrape off any excess wood inside the window opening and also inside the doorway. A small emery board works well for the doorway sides and can also be used to neaten up any rough log ends on the outside corners. NOTE: If you want a window on any other wall, go crazy! I've left both ends solid as I will be adding a big fireplace at one end and a sleeping area on the other, but the 'invisible' back wall has a window across from the front door to provide cross ventilation in the summer heat. GOOF ALERT: Don't put the window too close to the doorway, or you will weaken the front wall and it will start to bow inwards.
7) Cut 2 strips of thin wood or heavy card about 1/16" wide, long enough to reach from the floor to the top of the sixth row of logs above the base row, and another shorter piece abut 1/2" in length. Glue one long strip to each side of the door opening on the inside wall flush with the edge of the opening, to form a frame or trim on either side of the opening. Glue the short piece across the top of the door, trimming the excess or not as desired. If it overlaps the sides of the frame a bit you can use it to hang something long and thin beside the door such as a broom or buggy whip.
7) Now the final row of logs for the walls can be applied, just as you did in the previous step, and making any adjustments to the walls that may be needed as a result of cutting out the window(s).
That's all for tonight, but I'll be back as soon as I have time.
Many Mini Hugs.
Minimadgal
>>>COMING NEXT<<<:
MAKING A FIELDSTONE FIREPLACE AND THE EXTERNAL CHIMNEY.


